.jpg) |
| Revell's 1/32 scale Bf-109G-6 |
 | ||
MT-499 pranged, 1946.
|
This build is actually my second Finnish Gustav model, the first being the 1/48 scale ARII, (nee Otaki), kit, see: https://georgesmodels.blogspot.com/2020/03/amt-me-109g-6-in-finnish-colors.html
When I was building that kit, I found this Revell 1/32 scale kit available for $20! This is a relatively new tooling, actually a completely new kitset compared to the old 109F/G Revell had produced in the late '60s.
 |
| Interior components, look at that fuel line, really nice looking! |
Many Finnish 109's were equipped with tropical air filters, so I added one to my build. I used Quickboost's filter, it comes with an open and a closed version, so you actually get two filters with that set, something to same for another build.
 |
| Preparing the air filters for installation. |
Next came assembly. The interior was carefully tucked away into the fuselage. Care has to be taken in making sure comes together smoothly. The forward fuselage panels take a certain amount of care...
The wings include a short span of spar which helps insure a good dihedral angle for the wings.
I encountered a few gaps, at the wing roots and at the joint for the outer wing panels. I wish the upper wing panels were molded in one piece, but I can see why Revell did this, to be able to offer different models' wings.
I used stretched sprue to fill the gaps here and that worked pretty well.
The somewhat complex flap arrangement on the 109 is nicely reproduced by Revell. In fact, you don't have to glue them in, they can be posed however you like them. Unfortunately, one small tang on the upper wing panel had broken off, so I did have to cement one of the flaps down to keep it connected to the wing! Still, the result nice looking. I generally don't care for moving elevators, ailerons, or rudders, but Revell has included all these in this kit. Oh well, they worked out in the end.
Time for paint! I always enjoy these mid-war German schemes with the mottled finish on the sides. I used my Badger 105 for most of the main colors, then switched to my Velocity Renegade for the mottling. I was pretty happy with the results.
The photo of MT-499 also showed some bands of dark color on the nose. It looked like a hard line of demarcation along the rear of the back band, so I went with the assumption that the nose sections may have been replaced from another aircraft. |
| Note the dark bands added to the cowling panels. |
I also applied some exhaust stains along the side, it's a feature which seems universal on these A/C.
Decaling turned out to be a bit of an adventure. Of the three different decal sheets I had for a post war, 1/32 scale 109, not one had the correct size roundel for the fuselage! All were too big, being the same size as the wing roundels. I ended up using the roundels from a 1/48th scale sheet for the fuselage. The serial number, MT-499, was pieced together from various sources.
I used some data decals, but not many, from various sheets, none from the Revell sheet, those were just too thick and did not look good on the model.
 |
| Exhaust staining, I probably could have gone darker and maybe a little more extensive! |
Now time for the details. The Revell spinner has an unfortunate seam that really should be removed . I tried to lessen it before assembly but it still stood out. I eventually had to fill to after assembly which was pretty tricky.
 |
| A bad spot for a seam! |
Also on the subject of the spinner. The profile of this A/C indicated an all-white one, but I thought that was a little too much white! I decided to give it a segmented scheme, with a black section. This helped hide that seam and I thought it just looked nicer. A study of the photo doesn't rule out the possibility of this feature!
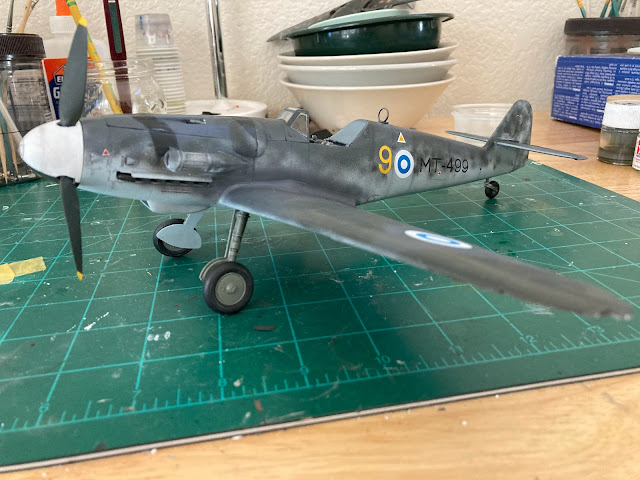
I finally got to the point of assembling all the various subassemblies, etc. The landing gear, I have to say, is rather complicated and I think could have been quite a bit simpler. There are some nice after-market brass sets which are tempting. Maybe I'll try some when I build the G-2/4.
 |
| Got her on her legs! |
The rest of the build went along okay, although it took me a while to figure out how to install the canopy! A combination of Tamiya tape, Legos and superglue finally got it in place! Stretched sprue was use for the aerial and for the "lanyard" holding the canopy in place,
 |
| MT-499 completed! |


No comments:
Post a Comment