 |
| AMT ME109-G6 in Finnish colors. |
Due to a hangup with the decals on my Nieuport build, I've decided to jump over to a different kit. I've had this ME 109 laying in the stash for many years, so now it's time has come!
 |
| Nice, original color shot of a Finnish Me109G-2 |
Finland resumed it's conflict with the USSR in 1941, unfortunately allied with Nazi Germany when the Germans attacked the Soviets. As an ally, Finland was able to procure a lot of war material from Germany, including ex-French Curtiss Hawk 75's, Dornier DO-17's and Junkers JU-88s. One of their most important, and (long lasting), acquisitions was the Messerschmidt 109.
Initially, Finland received a shipment of ME-109G-2 fighters. These were a welcome upgrade from their motley collection of international fights. In early 1944, the G-2's were supplanted with over 100 G-6 models. My model will represent one of these later G-6 "Gustafs". The G-6 featured a more powerful engine and heavier armament compared to the G-2, although handling and maneuverability suffered. In the airwar against the West, these were considered acceptable trade-offs. A total of 162 ME 109G's of various marks were acquired by Finland.
 |
| Nice example of the Finnish color scheme. This particular a/c is a G-8 reconnaissance fighter, one of two such marks purchased by Finland. |
 |
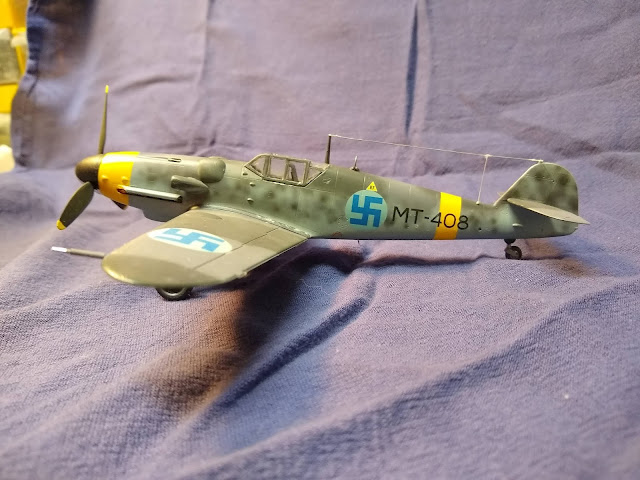
| ME-109G-6 MT-408. |
 |
| MT-416, a G-6 with short tail. |
Assembly:
The kit I'm working with is the old AMT/ERTL ME-109G-6 in 1/48th scale. It is a rebox of the ARII kit. For it's age, it seems to be a pretty nice model with decent detail and engraved panel lining. Since I'm going with aftermarket decals, (an SBS Finnish set), I'm not worried about the kit's decals, although I may try to use a few of the generic data pieces.
 |
| Caption |
I'm kind of excited about this build because I get to play with my airbrush quite a bit in producing the mottled German camouflage used on the wartime Finnish fighters.
Although a pretty old kit now, the AMT Messy looks pretty nice compared to the old Revell and Airfix kits of the late 60s and early 70s. It's got nice engraved panel lines and a pretty nice, albeit simple cockpit. That's where I started, I tried to spruce up the instrument panel by drilling out the bezels and backing it, using a piece of plastic stock. I also covered the molded seat harness belts with strips of masking tape with wire buckles. While I'm not entirely satisfied with the results, once the whole unit was assembled, I thought it looked okay.
 |
| A little work on the cockpit assembly. |
 |
| Cockpit assembly installed. |
After assembling the fuselage and wings, I attempted to mask the canopy, using strips of Tamiya tape. It looked okay, but in the event there turned out to be several flaws in my taping!
 |
| Canopy masked. |
I glued the masked canopy to the fuselage and then shot the whole thing with Tamiya primer. This is really stinky stuff but it works very well indeed! The priming revealed a couple of flaws in the finish which I was able to correct, then a second coat was applied. Now it was time for the color coats. I first applied the yellow theater markings on the nose and fuselage sides and the lower wingtips. I masked these areas in order to create a barrier to prevent the other colors from bleeding into the yellow. Yellow is a tricky color to apply, it took three coats of Testor's flat yellow to get a good coverage.
 |
| Primed and first color coat, the yellow theater markings. |
Next was a coat of the underside camo, RLM 76, which I created from a mix of Tamiya acrylic paints. Then came the camouflage of RLM 74 and 75 on the upper surfaces, again this was a mix of Tamiya paints. The upper colors were applied freehand with my Master G33 airbrush and I was happy with the results; this was the first time I've tried freehand painting with the brush!
I must say that Tamiya acrylic is a joy to work with. Thinned with 91% IPA, it flows beautifully through an airbrush.
 |
| Freehand mottling with the airbrush. |
Next up was a real test of my airbrushing skills, the mottled effect of the fuselage side! Again using the G33 and with my compressor's regulator turned down to 15 pounds of pressure, the mottling went very well. It really was a lot of fun!
Now it was the moment of truth, time to remove the masking tape! Much to my relief, the camo colors did not bleed into the yellow! Everything looked good until I removed the canopy masks.
 |
| Masking tape off. all good except the fuselage band is too narrow! |
Now it was time for the decals. First, I brushed on two coats of Future, to give the decals a smooth surface to settle on. Then I applied the SBS decals and just a couple of the data decals from the original kit.
 |
| Decals applied. |
With decals applied, a coat of dullcoat was then sprayed onto the kit. I then removed the canopy masks and found that the primer had seeped through gaps in my taping. I had to spend some time scraping and polishing the clear plastic to remove the traces of the primer, then I had to hand paint the canopy frames. Fortunately the ME109 has pretty straightforward canopy framing!
Now it was time for final detail painting and assembly.
 |
| MT-408 completed! |
The result is an attractive model, but one not without a few hiccups; The fuselage band is too narrow, and I believe the aircraft numbers are a tad oversized. Also, the white section of the prop spinner is oriented a little off, the demarcation should be between the prop blades not at them! All of these I discovered a little too far along to really want to try to correct on this model. I'll just have to do better next time!
Incidentally, while researching this build, I discovered this little treasure:
Available for $20, I snapped one up!


No comments:
Post a Comment