Monday, December 18, 2023

Revell BF109G-6 in Finnish markings, 1/32 scale.


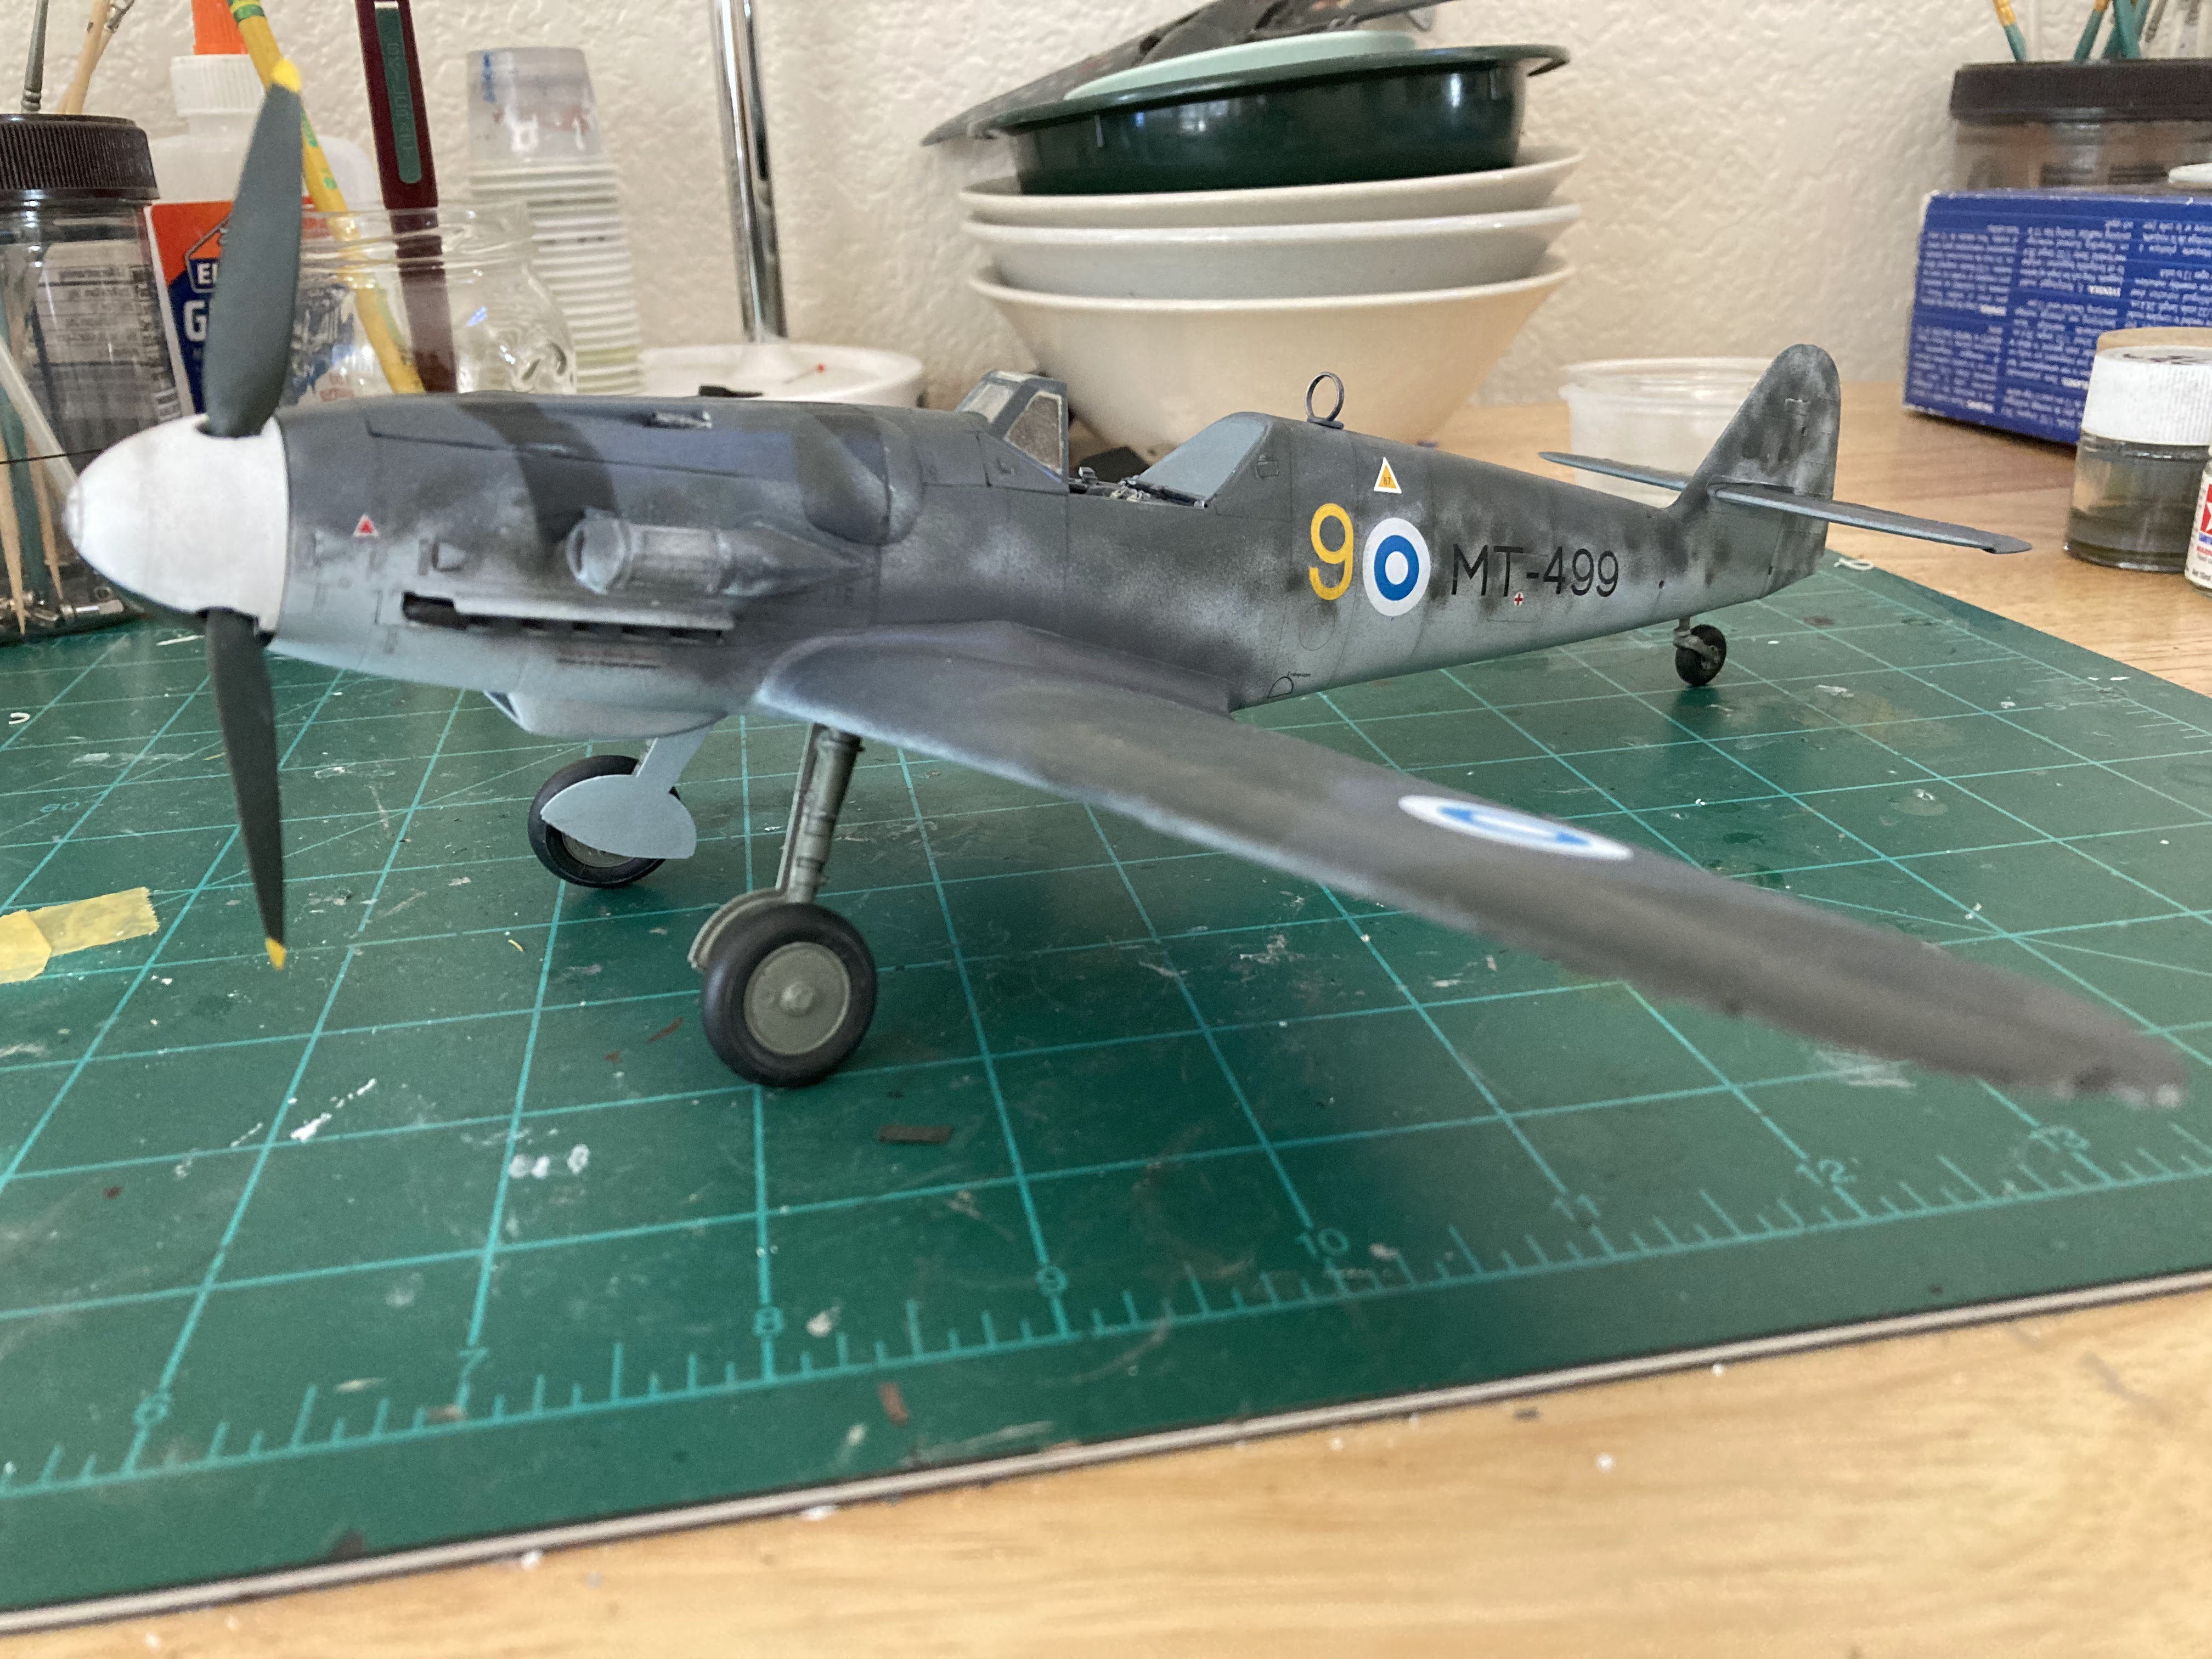
Revell's 1/32 scale Bf-109G-6


MT-499 pranged, 1946.


My rendition, from the Revell 1/32 scale BF-109G-6.


This build is actually my second Finnish Gustav model, the first being the 1/48 scale ARII, (nee Otaki), kit, see: https://georgesmodels.blogspot.com/2020/03/amt-me-109g-6-in-finnish-colors.html

When I was building that kit, I found this Revell 1/32 scale kit available for $20! This is a relatively new tooling, actually a completely new kitset compared to the old 109F/G Revell had produced in the late '60s. 

And what a nice kit it is! Revell offers a choice of early or late model G's, with the standard or later tall rudder and standard canopy or the later Erla type. 

Since I enjoy modeling Finnish aircraft, I wanted to do another Finnish G. But this time, I wanted to try a post-war variant.

The Finns used to Messerschmidt fighter as an operational fighter longer than almost any other air force with the possible exception of Spain, who actually continued to manufacture their own into the 1950s. The 109 was the most numerous fighter in the Finn's inventory at the close of WWII, so it was a natural choice to continue to use them. 

After some hemming and hawing, I finally decided to model Mersu # MT-499. My reference, Stenman's and Keskinen's excellent book on the Finnish 109 had one grainy photo and a profile of this A/C. The brief summary of it's history indicate it was received in late August 1944 and delivered to HLeLv 33 at that time. In 1952, it was delivered to HLeLv 31. It was finally stored in March of 1953 with a total of 385 hours logged. That's a pretty good life for an old warbird.

The photo I based my model on was taken after an accident in December, 1946. There are a couple of features that attracted me to this scheme. First, it was a "late" 109G, with the tall tail and Erla hood, both features that I wanted to model this time. It's also displays post-war Finnish roundels but still retains the original Luftwaffe camouflage, (for the most part). 

The start of the build, I managed to amass a large number of decals for this one!

This is the first of the newer generation of Revell 1/32 scale kits that I have attempted to build, (I now also have their new Spitfire Mk IX and 109G-2/4 in the stash). I have to say that I'm quite impressed with these kits. The detail is really quite nice and fit seems pretty good. 

I started assembly, after washing the sprues in soapy water, with the interior. Lots of nice things to be found there, but I did decide to use an aftermarket seat. The Barracuda Studios 109G seat comes with nicely molded harnesses which made detailing the interior very easy. The part is designed for this kit and pops right in. The sculpturing on the harnesses looks just right in my opinion. Everything else in the interior is from Revell, even the decals for the instrument panel, although they were a challenge to apply, being quite thick they required a lot of decal softener to get them to settle down.

One feature I really enjoyed was the fuel line being molded in clear plastic! Careful painting made this feature really stand out. It's a nice touch.


Interior components, look at that fuel line, really nice looking!

Many Finnish 109's were equipped with tropical air filters, so I added one to my build. I used Quickboost's filter, it comes with an open and a closed version, so you actually get two filters with that set, something to same for another build.


Preparing the air filters for installation.

Next came assembly. The interior was carefully tucked away into the fuselage. Care has to be taken in making sure comes together smoothly. The forward fuselage panels take a certain amount of care...

The wings include a short span of spar which helps insure a good dihedral angle for the wings. 


I encountered a few gaps, at the wing roots and at the joint for the outer wing panels. I wish the upper wing panels were molded in one piece, but I can see why Revell did this, to be able to offer different models' wings.

I used stretched sprue to fill the gaps here and that worked pretty well.


The somewhat complex flap arrangement on the 109 is nicely reproduced by Revell. In fact, you don't have to glue them in, they can be posed however you like them. Unfortunately, one small tang on the upper wing panel had broken off, so I did have to cement one of the flaps down to keep it connected to the wing! Still, the result nice looking. I generally don't care for moving elevators, ailerons, or rudders, but Revell has included all these in this kit. Oh well, they worked out in the end.


Time for paint! I always enjoy these mid-war German schemes with the mottled finish on the sides. I used my Badger 105 for most of the main colors, then switched to my Velocity Renegade for the mottling. I was pretty happy with the results.

The photo of MT-499 also showed some bands of dark color on the nose. It looked like a hard line of demarcation along the rear of the back band, so I went with the assumption that the nose sections may have been replaced from another aircraft.


Note the dark bands added to the cowling panels.

I also applied some exhaust stains along the side, it's a feature which seems universal on these A/C.

Decaling turned out to be a bit of an adventure. Of the three different decal sheets I had for a post war, 1/32 scale 109, not one had the correct size roundel for the fuselage! All were too big, being the same size as the wing roundels. I ended up using the roundels from a 1/48th scale sheet for the fuselage. The serial number, MT-499, was pieced together from various sources.

I used some data decals, but not many, from various sheets, none from the Revell sheet, those were just too thick and did not look good on the model.


Exhaust staining, I probably could have gone darker and maybe a little more extensive!

Now time for the details. The Revell spinner has an unfortunate seam that really should be removed . I tried to lessen it before assembly but it still stood out. I eventually had to fill to after assembly which was pretty tricky.

A bad spot for a seam!

Also on the subject of the spinner. The profile of this A/C indicated an all-white one, but I thought that was a little too much white! I decided to give it a segmented scheme, with a black section. This helped hide that seam and I thought it just looked nicer. A study of the photo doesn't rule out the possibility of this feature!

I finally got to the point of assembling all the various subassemblies, etc. The landing gear, I have to say, is rather complicated and I think could have been quite a bit simpler. There are some nice after-market brass sets which are tempting. Maybe I'll try some when I build the G-2/4.


Got her on her legs!

The rest of the build went along okay, although it took me a while to figure out how to install the canopy! A combination of Tamiya tape, Legos and superglue finally got it in place! Stretched sprue was use for the aerial and for the "lanyard" holding the canopy in place,


MT-499 completed!


I enjoyed this build, I'm starting to realize that I appreciate modern model kits and their engineering. That said, there are a few areas where this kit was maybe a trifle over-engineered, LOL. 

Anyway, I have the G-2/4 version of this kit in the stash, I'll look forward to that build, too. Next time, I'll use the Barracuda seat again, along with their spinner and possibly their tailwheel, these are nice features that make  assembly a little quicker.

Tuesday, May 16, 2023

Hobbycraft SPAD XIII in 1/32 scale.


It was time for another WWI build. This time I chose the Hobbycraft SPAD XIII which has been waiting patiently in the stash. I decided to make Charles Nungesser's SPAD. Nungesser was a real iron man of WWI, he was seriously wounded several times but still amassed an impressive score of some 44 kills. The majority of his victories were gained in various models of Nieuports, but he ended the war in a SPAD XIII, in which he attained at least a couple of kills.

"By the end of the war, a succinct summary of Nungesser's wounds and injuries read: "Skull fracture, brain concussion, internal injuries (multiple), five fractures of the upper jaw, two fractures of lower jaw, piece of anti-aircraft shrapnel imbedded [sic] in right arm, dislocation of knees (left and right), re-dislocation of left knee, bullet wound in mouth, bullet wound in ear, atrophy of tendons in left leg, atrophy of muscles in calf, dislocated clavicle, dislocated wrist, dislocated right ankle, loss of teeth, contusions too numerous to mention."  (from theaerodrome.com)

The SPAD I chose to depict is from the time before August of 1918. The photos I've found of his SPAD are all taken after August, when his friend, a Lt. Verdrier, was killed in a bombing raid.  After that, Nungesser put his friend's name on the SPAD. Now, Hobbycraft supplied this name, but in black. Photo's show it as in a light color, probably white. After Verdrier's death, Nungesser recorded no further victories. I decided that I'd show the SPAD before Verdrier's death, when Nungesser actually scored in the aircraft. I also to a little artistic license and assumed the early gun camera was not yet mounted, just to make things easier since I had no way of knowing what one of those would look like!


Nungesser's SPAD.


Here's Nungesser himself in the SPAD, this is after August, 1918.


A similar view of my completed model.


The Hobbycraft SPAD came out sometime in the 1990's. You can still find them on eBay at reasonable prices. The Wingnut Wings crowd won't even consider them, so that's good for you if you're looking! Also, I should mention that Roden has recently produced two versions of the SPAD XIII, the early, rounded wingtip model and this later one. They look pretty good and are not outrageously expensive!

Since I'm going with Nungesser's scheme, I will be using the kit's decals. This is always a little worrisome because 20-30 year old decals can be a real gamble!


Interior work.


First step in assembly, (after washing everything in soapy water), is to assemble the interior. Here, the kit gives you a nice basis on which you can add as much detail as you care. I added some rigging, control cables and harnesses. The kit provides a few instruments which seem close to the simple instrumentation of the actual aircraft.


Fuselage side and the cockpit tub.


After closing up the fuselage and installing the lower wing, I began pre-shading to get a nice visual effect of the ribs and longerons against the linen. In this case, since the upper surfaces would have an opaque coat of dope, I decided to put a light base color down, followed by masking then a dark brown coat, then a thinned coat of  buff which will allow the lighter lines to show through.


Light color base, masked.


Followed by a dark coat with the tape removed to show the light rib color.


Finally a thin coat of buff. The result shows the light wood framework showing through the linen.

The lower surfaces were actually the easy part of this paint job! Now came time for the FIVE color upper camouflage used by the French! I referred to the Wingnut Wing's Salmson kit instructions for color formulas for Tamiya paints to approximate the French scheme. Then starting with the tan, I applied each color. Spraying, letting dry, masking, then spraying again. The process took about a week. I liked the results. But I the realized that I had forgotten about the white flash on the fuselage top! Oh bother!

Now, there seems to be some disagreement regarding this white flash. Some references say that it is all white and was offset to throw an opponent's aim off. Eduard has produced a nice 1/48th scale kit and shows this as being actually a tri color design not offset at all. It is possible, given the film oddities of the time, that this is possible. But examining the photos, it sure looks to me that the flash is all white and offset so that's what I went with.


Camouflage done and white flash added. 


Painting the tail stripes.


As usual, the rudder stripe decals did not set very well at all. I assumed they wouldn't and quickly masked them off and painted them. The trickiest part here was matching the shade of blue which Hobbycraft used for the roundels. Incidentally, the kit's decals actually worked okay for the most part, except, of course, for the tail stripes. Fortunately, the script for the tail was a separate decal which went on well.


Painting done, awaiting assembly


The next challenge was the normal one for all biplanes; attaching the top wing! It concerned me a little that the instructions stated that the outboard struts would most likely be too long and would require trimming! I installed the cabane struts and the inboard struts to the fuselage and lower wings and let them dry thoroughly. Some of the rigging had already been installed on the inner interplane struts and on the upper wing. I also had drilled a few holes for the flying wires, coming from the upper wing to enter near the lower fuselage.

 I then installed the upper wings to these struts with little trouble. Installing the outboard interplane struts did require a little trimming but they went in, again without too much trouble.


Top wing installed!


With the wings installed, rigging began in earnest. I used double wires for some of the rigging. On the actual aircraft, these wires were taped together but I haven't figured out a way to simulate that yet, so I left them as open doubled wires.

The landing gear on this kit is wonderfully robust! That's something you can't take for granted in these WWI aircraft. 

The final challenge for this kit was attaching the aileron pushrods. Hobbycraft gives you two pieces for this assembly. I had cemented the triangular shaped pivots on to the lower wing but getting the pushrod and the curved control arm in proved to be too difficult. I finally figured out the by cutting the pushrod off of the control arm made things a lot more manageable.

Here's a shot of the aileron pushrod assembly.


With that final hurdle overcome, all that was left was a little pin washing. I didn't do a much weathering aside from some oil staining around the engine.

Overall, I found this a pretty pleasant build. The kit was simple but contained enough detail to make a good foundation for further detailing. I can recommend this kit, but it will be interesting to build the new Roden version for comparison.

Here are some pictures of the completed SPAD XIII: