Friday, April 4, 2025

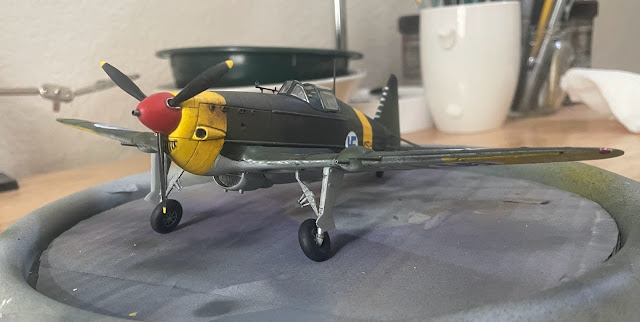
Hobbycraft Morane Saulnier 406 in 1/48 scale.


Hobbycraft Morane 406 in Finnish markings, 1/48th scale.

MS-304. Note the lowered radiator.

My latest build is a Hobbycraft Morane Saulnier 406 fighter. The French made aircraft was an important addition to Finland's Air Force strength during the latter part of the Winter War and for the first couple of years in the Continuation War. In fact, I was surprised to learn that it was the third most numerous fighter in the Finn's inventory, (After the Fokker D.21 and the Messerschmidt 109!). 

The Morane was fairly successful against the early Soviet opposition but it's shortcomings gradually became more obvious as better Russian aircraft and pilots came to the fray. Eventually the Finn's re-engined the 406 with Russian motors taken from captured LAGGs and thus the "Morko-Morane" was born, although too late for a meaningful contribution to the Continuation war.

The Finnish Moranes are a bit more complicated to model than you would expect as there were several subtle variations. Kari Stenman and Kalevi Keskinen have compiled a useful reference in their 4th volume of the "Suomen Ilmavoimien Historia" series which helps to wade through the differences.

The first Moranes were a gift from France during the Winter War, these were the standard 406 with the troublesome retracting radiator. These were serialed MS-301 to MS-330. The next batch was purchased from Germany (as war booty) in late 1940. Three more batches of "war booty" Moranes were purchased from Germany through 1942. The aircraft from Germany were numbered in the MS-600 range. These also included a few MS.410 aircraft which differed from the 406 by having two guns in each wing and no gun blister.

In modeling a Finnish Morane, you have to watch which model the aircraft actually is. You have at least four variations to consider: The standard MS.406, these were in the 301-330 range. The Moranes from Germany could be identical, or they could have the fixed radiator, or they could be a 410. Later in the war, there was the possibility that you may encounter an overhauled 406 with a 410 wing! Finally, there is the Morko Morane, but that falls outside the scope of my build.

All this is to say this; be sure you have a decent reference to the exact aircraft you're trying to model!

The kit, accessories, and references on hand!

The kit itself is an older Hobbycraft product and is, well, a little lacking. Detail is a bit sparse and there are some discrepancies in shape and outline. There is a new model of the 406, from Dora Wings, which is much, much better. Well, I already had this kit and I don't like wasting things, so I went ahead and used this kit.

First of all, you will notice that the elevators are misshaped. As they are, they would be impossible to operate so you have to rescribe them. 

First thing to do is to correct the elevators!

Next the nose looks a little plain. I drilled out the exhaust stubs and carved out the air intakes,

Here I have drilled out the exhaust pipes and the air intakes.

I actually found an aftermarket resin interior for this very kit so I installed it in place of the kit's.

The resin interior adds a little character!

Assembly then continued in the usual fashion. The fit was generally okay and I find the quality of the plastic used by Hobbycraft to be easy to work with. The worst fit was the grille in the lower nose of the aircraft. This required considerable sanding to blend in with the contour of the nose.

An unusual wing to fuselage assembly.


After basic assembly I primed the model and then began painting the yellow theater bands. I usually do this on my Finnish models since yellow is tough to apply over anything but a nice white base.


Painting has begun. As usual, I have applied the yellow bands first.


I originally intended to finish this aircraft in the original French color scheme of grey/green/brown over a lighter grey, but, try as I may, I could not get a decent looking pattern down!

Notice the gun barrels and pitot tube. These were made from brass tube and rod.


My first attempt at painting the French camo. I just couldn't make it look good.


See what I mean? I just couldn't make it look right, so I...

I finally gave up on that scheme and went with the standard green/black camo found on Finnish repaint jobs!

...punted and went with the standard FAF camoflauge!

Most of the masking removed, I'm feeling better about the paint job now.


Then it was a matter of selecting which aircraft I wanted to model, which proved to be a little tricky due to the number of variations in the aircraft configurations. I finally decided of MS-304, a standard 406 which had a fairly successful carreer as evidenced by the six kill markings on its tail!


A coat of Future and then the decals are started.

I used a variety of decals for this model, in fact I can't even identify which national insignias I used for the wings, but they proved to be difficult to settle down over the pronounced ribs on the Morane's wing! The serial numbers came from the Techmod national insignia set which provides two sheets of serial numbers in various sizes and has proved to be very useful.

The final assembly went on without any mishaps; The unusual landing gear configuration was easy to achieve. I could not find any photographic evidence of an antenna wire leading from the tip of the tail to the upper mast, so I didn't add one. I had replaced the upper mast with stretched sprue since the kit's was too thick. The 406 is unusual in that it also had a lower mast which was extended in flying configuration. I used the kit's "knuckle" for this lower mast but replaced the actual mast with stretched sprue.


The final step in my build was to finish the navigation lights on the wingtips. For these I masked off a "square" on each wingtip and applied some silver paint by brush. After that had dried, I applied Tamiya clear red and clear green to the appropriate light. This looks pretty nice to me.


The grey panel represents a walkway which appears on at least some 406's.

Thus ends my latest build. In the end the model looks pretty good but there is a much better alternative to the Hobbycraft kit now and I would recommend anyone wanting to build a nice replica of the MS 406 to look at the Dora Wings offering. 

That said, if you have the Hobbycraft MS 406 or 410 in the stash, (they are actually identical molds), then go ahead and give it a shot!


Wednesday, January 8, 2025

Fokker E.III Eindecker, Wingnut Wings in 1/32 scale


Wingnut Wings Fokker E.III


Hans-Joachim Bruddecke's Fokker E.III 96/15


Alternative scheme, serial number unknown, appears to be a dark finish.

I felt it was now time to dive into my stash of Wingnut Wings kits! Having completed several Hobbycraft and Roden WWI kits, I think I'm ready. I decided to try the Fokker Eindecker for a start since it is a monoplane, that should make it easier, right?

The subject of my build is the Fokker E.III deployed to Turkey and flown by Hans Joachim Buddecke. We know the color scheme of this particular E.III is described by Buddecke himself as "my yellow bird with black threatening eyes"... There is another photo of Buddecke beside an E.III which appears to be painted in a dark color, but there is some dispute as to whether it was actually a dark tone or the result of a the type of film used at the time. At any rate, there is little dispute as to 96/15's scheme, as there is photograph proof and Buddecke's own discription.


To get things started, I decided to experiment to get that unusual "brushed" aluminum effect found on the cowling and panels of the Eindecker. 

I sprayed a scrap cowling with Tamiya Flat Aluminum and let it dry. Then I took a Signo Uni-Ball silver pen and scribbled random patterns onto the aluminum. The pen's ink sets up to be shinier that the aluminum paint, so there is a subtle difference which, I think, approximated the effect I was seeking pretty well.

You have to look hard to see the difference, it is a little more prominent in person.

Another view, maybe a little more visible here.

Having decided that that would work, I began the normal assembly, starting with, as usual, the interior. Wingnut Wings kits have excellent instructions and of course, the parts are well molded and construction was thoughtfully designed so you have a pretty good chance of success!

The completed interior.

With the interior completed, I assembled the fuselage and started painting. I used a pre-shading technique to break up the overall tan finish, and it turned out pretty well, giving a nice and not-to subtle effect, especially on the wings and fuselage sides.


Next was a new challenge for me; painting the national markings. Because these were the Turkish insignias, things were somewhat simple, just black squares on a white field. On the actual aircraft the squares were made by simply painting over the original Maltese Crosses of the German aircraft, so I was able to use the kit's marking for measurements.


All went well until I realized I had placed the fuselage square to far aft! I had to strip that off and repaint it further forward. After fixing that, I was able to apply the decals for the serial number. The actual s/n for Buddecke's aircraft was "96/15". I had a 9 and an 8 available so I used those and then painted the 8 to resemble the correct 6.


The motor was another subassembly. Like the interior, this was a little gem, fun to assemble, detail and paint. Nest, I turned to the photo-etched, (PE) cooling jackets for the Spandau. This time around, I tried a low temperature solder paste and heat gun to assemble the jacket and end cap. After a couple tries, I sort of got the hang of it. I also assembled a couple of other PE jackets to get the method down. I now feel pretty confident and look forward to my next WWI German fighter build!


At last, it was time to begin assembly! The fit of the wings into the fuselage is quite snug; I had to sand the lugs on the wings a bit to get them to slide in. Next, it was time to begin the rigging. On this aircraft the rigging, particularly on the underside, looks hopelessly complicated. But after studying the diagrams and photographs, I gradually got a handle on the pattern. I started with the undercarriage rigging. Then, I drilled out the holes in the wings to allow me to run the wire from the topside to bottom. This simplified the process considerably and created a support for the wings. 

After the undercarriage rigging, I ran the wing warping wires. I had lost the kit's piece which was supposed to represent the pulley wheel for the wires so I found an unlikely replacement, the tailwheel of a 1/48 scale Brewster Buffalo! After a little carving and drilling, it looked pretty good and actually worked better for my purposes.

F2A tailwheel repurposed into a pulley wheel!

Anyway, I ran the warping wires through this pulley, then through the appropriate holes in the wings and down to the control horns at the rear of the undercarriage. Next, the fixed flying wires were tied to the molded "turnbuckles" on the forward mast, then run through the front holes in the wings and to the forward part of the undercarriage. 

The result is nicely complicated looking but actually not so hard to achieve! All went pretty well, but I almost missed the forward two lines which ran from the cowling to the forward inboard wing rigging station. Fortunately those weren't too hard to add.

Rigging work continues.


One last touch was to add Copper State Models spoked wheels. These seem like a bargain at $16, and they look very scale like. I thought they would be fragile but they seem sturdy enough. They are hard to paint since you don't want to cover the fine details. 

Copper State Models spoked wheel.

The final step was a light coat of Windsor and Newton dull coat to kill some of the shininess from the upper surfaces. My first Wingnut kit is complete!